
Label Size Guide: How to Make Sure Your Labels Fit
To choose the right label size, measure the flat surface where the label will go, then pick dimensions that stay within that space—especially if there’s any curvature. Always size the label to the container, not the other way around. You can use our color coding or container label collections to help test fit before ordering.
How to Choose Label Size: Start with the Surface
The container always calls the shots. Whether it’s a jar, shipping box, or deli lid, you’re working with a fixed surface area—so your label has to fit comfortably within that space.
Why the container comes first
If your container has curves, tapers, or seams, a label that’s too big or oddly shaped will bubble, crease, or peel. Start by asking: Where exactly will this label go?
How shape and curvature affect sizing
Flat surfaces are flexible—you can go bigger, taller, or wider. But round or curved items (like bottles or jars) need smaller, tighter labels that won’t lift or wrinkle.
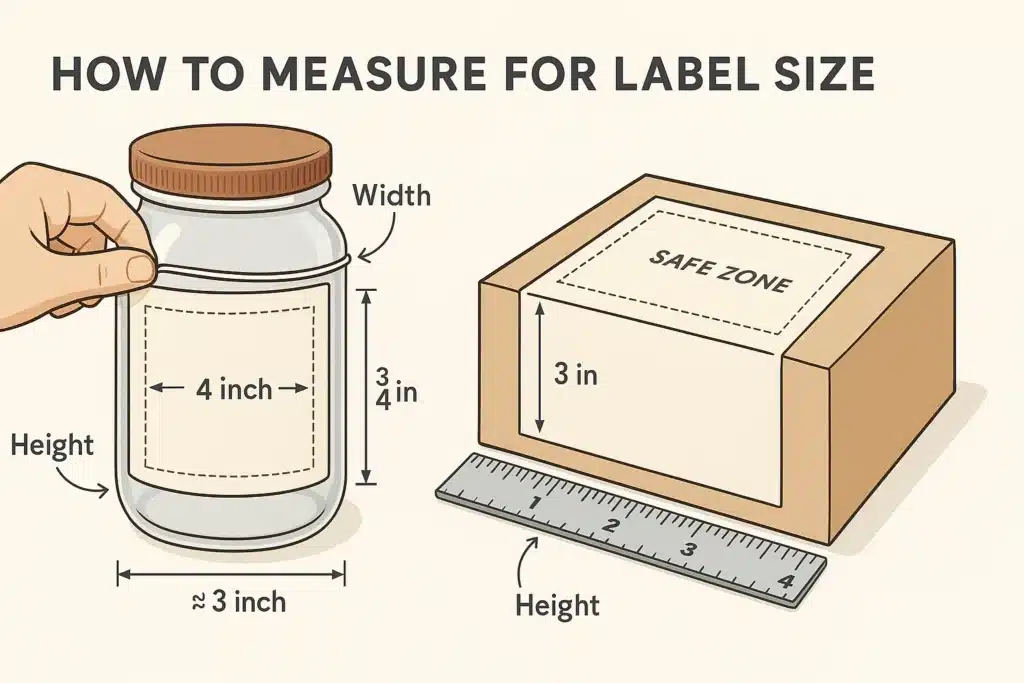
How to measure flat and rounded surfaces
For round containers, use a string or cloth measuring tape to wrap around the area where the label will sit. For flat surfaces, a ruler works. Always subtract about 1/8″ (or 0.125″) from both dimensions to give yourself a buffer.
Common Label Shapes and What They’re Best For
Label shapes aren’t just a style choice—they affect fit and function.
Rectangle vs. square vs. circle
- Rectangles are versatile and fit well on jars, boxes, or pouches.
- Squares offer a clean, centered look—ideal for logos or ingredient blocks.
- Circles work best for lids, top seals, and price tags.
When to use oval or custom shapes
Oval labels are great for curved surfaces—they follow the line of jars and bottles. Custom shapes can work, but they’re usually reserved for high-volume or branded packaging.
Use case examples
- Jars: Rectangle on the side, circle on the lid.
- Boxes: Square or rectangle, front-facing.
- Deli containers: Rectangle across the lid, small circle on the edge.
What Size Label Do I Need? Measuring for Fit
If you’re asking that, you’re not alone. It’s one of the most searched labeling questions—and it’s easier than you think.
Use a flexible tape or string
Wrap the tape or string around the area you want to label, then measure that length against a ruler. Do the same for height. If it’s a lid or cap, just measure the diameter.
Account for safe zones
Don’t let your label run edge to edge. Leave a little breathing room (at least 1/8″) to avoid peeling and give it a clean look.
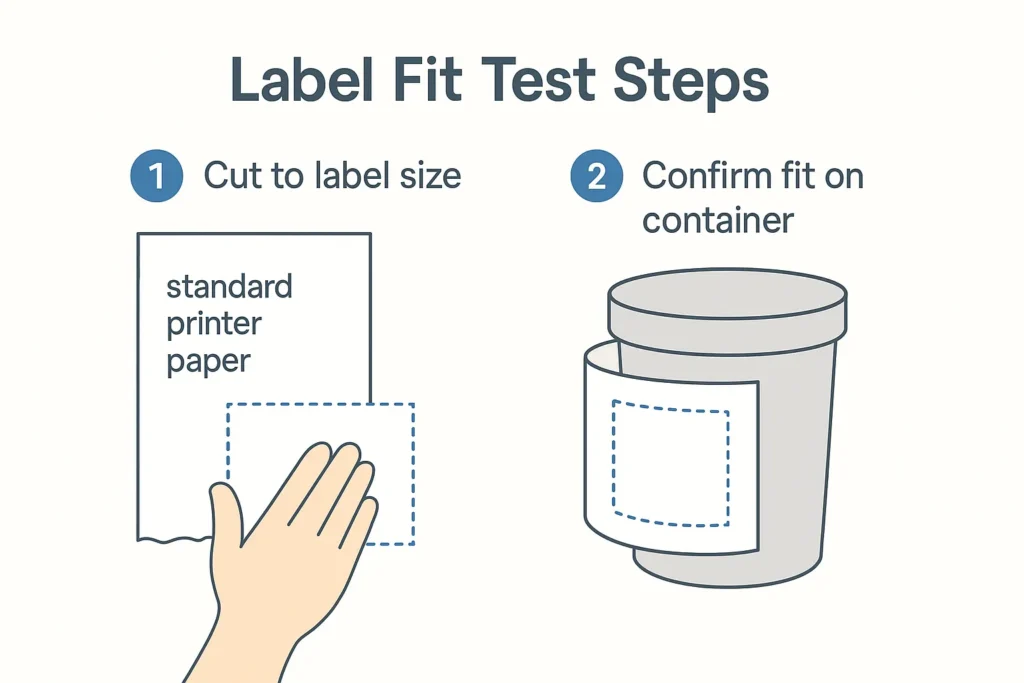
Try a real-world fit test
Cut a piece of paper to the size you’re considering. Wrap or place it on your product. If it folds, wrinkles, or covers too much, scale down.
Printable Label Size Options: Common Standards
You don’t have to guess—most label sizes fall within a set of tried-and-true dimensions.
Most popular sizes
- 2″ x 1″: Perfect for small jars, test tubes, or shelf tags.
- 2.5″ x 3″: Common for deli lids and takeout containers.
- 4″ x 2″: Ideal for larger boxes or packaging fronts.
- 3/4″ dots: Great for inventory coding or quick ID tags.
Printable label size charts
Look for downloadable PDFs from trusted suppliers (including us) that show dimensions at actual scale—so you can cut, test, and decide before ordering.
How label size affects readability
Smaller labels mean smaller fonts. If your label includes ingredients, instructions, or barcodes, make sure there’s enough room for legible type and clear layout.
Quick Label Size Chart by Use Case

Jars and bottles:
- Small spice jar: 1.5″ x 1″
- 8 oz jar: 2.5″ x 2″
- Sauce bottle: 2″ x 4″ wraparound
Boxes and packaging:
- Product mailers: 3″ x 2″
- Subscription boxes: 4″ x 3″
Retail & shelf labels:
- Pricing: 1″ circles or squares
- Barcodes: 2.25″ x 1.25″
Tips for Custom or Odd-Shaped Containers
Not everything fits a template—but there are smart ways to handle the weird stuff.
Workarounds for curved and uneven surfaces
Try smaller labels or go with flexible shapes like ovals. You can also apply two smaller labels instead of one large one if needed.
Wraparound and tamper-evident options
Wraps are good for bottles or tubes. Tamper-evident strips are useful for food containers or pharmacy use—just make sure sizing allows for proper sealing.
Before you order custom sizes
Always test with mockups or request samples. Custom = commitment, and mistakes can get expensive.
How Label Material Affects Fit
Believe it or not, the label’s thickness matters.
Thicker materials change things
Heavy-duty or laminated labels might need a hair more space to lay flat—especially on curves.
Adhesive and surface texture matter
Glossy or textured containers sometimes resist sticking. Test before ordering in bulk, especially if you’re using specialty adhesives or surfaces like silicone, foil, or textured plastic.
Labeling for Compliance and Readability
The right size isn’t just about looks—sometimes, it’s about meeting standards.
Minimum font sizes
FDA guidelines, for example, require a font size that’s legible without a magnifier—usually at least 6pt, often larger for small packaging.
Make space for required info
Barcodes, nutrition panels, expiration dates—don’t cram them. If you need to include all of that, choose a larger label or split info across front and back.
Label Fit Test: Try Before You Print
Here’s how to know if your label size is right—without wasting material.
Paper test method
Cut a blank sheet of paper to your intended size. Place or wrap it on the container. Does it curve, bubble, or sit flat? Adjust as needed.
Free mockup templates
Many suppliers offer label layout templates you can download and edit. Just match the label size you’re considering, enter your content, and print a mockup on paper.
Label Orientation Matters
You’d be surprised how often this gets missed.
Portrait vs. landscape
A 2″ x 3″ label might work better rotated, depending on your surface. Always test both ways.
Round vs. flat containers
Round jars usually work better with vertical labels. Boxes and pouches often look better with horizontal orientation.
How to Measure Labels for Containers
Let’s keep this simple.
Quick method for beginners
Grab a string, wrap it where the label will go, mark the length. Measure that length and the height. Done.
For curved or lid spaces
You’ll want a bit of taper tolerance, so test multiple sizes if possible. Don’t let the label fall over an edge or curve.
Need Sizing Confidence? Try a Label Fit Test First
Before committing to a label size, do a paper fit test or use one of our standard labels for comparison. It’s quick, costs nothing, and saves time later. If you’re not sure what fits best, check out our color coding collections—they’re stocked with a variety of sizes to help you decide without guessing.
FAQs
What’s the best label size for deli containers?
Try a 2.5″ x 3″ rectangle for top placement. For smaller lids, consider 1.5″ or 2″ circle labels.
How do I know if my label will wrap properly?
Use a flexible measuring tape or test paper label. Check that it doesn’t wrinkle or overlap at the ends.
What label size fits an 8 oz jar?
A 2.5″ x 2″ rectangle works well. If labeling the lid, try a 2″ circle.
Can I use one label size for different products?
You can—but make sure the label looks intentional and doesn’t cover curves, seams, or key packaging features.
How much space do I leave for text and barcode?
Leave at least 0.125″ around the edge. Make sure font is legible (6pt minimum) and barcodes have white space around them.
Where can I find a label dimensions guide?
Use supplier size charts or printable PDF guides with scaled visuals. Or test fit using our most popular pre-sized labels.